Online Workshop Logistics and Screen Layouts
We just ran another online Software-Carpentry workshop with the University of Delaware. It was spread across 4 days over 2 weeks where each day covered a single topic. Thanks to all the instructors (Book Moyers, Daniel Chen, Sébastien Vigneau, Lorraine Ling) and helpers (Adam Faranda, Anders Kiledal, Heidi Van Every, Iman Bhattacharya, Jose Daniel Chazi Capelo, Madolyn MacDonald, Menolin Sharma, Preethy Nair, Riza Li, Sachin Gavali) to make the process go smoothly.
The major logistics we needed to work on were instructor-helper-host communication, managing the online workshop, and how learners would set up their screens, if they only had a single monitor.
Communication
Instructors need a form of communication outside of the main Zoom chat so they can coordinate and have discussions that are not relevant to the students in the main group chat.
Zoom chat can send direct messages. If a student needs help, an instructor may DM the student but we wanted a way to prevent multiple helpers DMing a student at once. The workshop settled on using a WhatsApp group since there are online and phone versions of the application. This way the actively teaching instructor can potentially monitor the internal chat as well.
Using your phone as a chat screen is handy for both the instructors, helpers, and students.
Workshop logistics (Zoom)
We needed the ability for stuck students to get code working on their end without stopping the actual workshop. We used Zoom breakout rooms for this. However, these were only really used on the first day getting Git Bash working properly for students. Most of the time we used the breaks to help the few students who needed help.
Create breakout rooms
- Each helper assigned to a room with their name
- Students assigned to a particular room so they can quickly go into a room
- Pre-assign students and/or assign them as students join the workshop
No room ghosting problems
- Everyone can go off into a breakout room, leaving the main room empty, and you will still be able to come back to the main room (this used to be an issue in older versions of Zoom)
Chat persistence
- The “everyone” chat is relative to who is in your current room
- Things said in a breakout room will only persist for yourself, not the entire class
- (co)hosts can broadcast messages, but they show up as a popup, not in the chat window. Message lasts about 3 seconds before fading away from the video screen
- The “everyone” chat is relative to who is in your current room
Some other non-breakout room related Zoom logistics:
- Use a waiting room to make sure people attending are the ones who signed up and to prevent zoom bombing.
- Instructors + helpers all co-host (so they can go into any break out room)
- Side-by-Side mode under View Options may make the shared screen a little larger.
- Have the co-instructors, helpers, and host append “instructor” or “helper” to the end of their zoom names
- This makes separating the students in the participants’ list easier.
- Use a waiting room to make sure people attending are the ones who signed up and to prevent zoom bombing.
Working only on a single screen
This section is focused on trying to get as much information displayed on a single screen during a workshop (for students, helpers, and instructors not actively teaching). Having a second monitor will greatly improve the learning and helping experience, but not everyone has access to a second monitor. You can also opt to set up “virtual desktops” where you can toggle between different layouts, but not everyone uses so this section will just focus on a single screen view.
Setting up virtual desktops can be done by looking at these instructions:
- Windows: https://community.windows.com/en-us/stories/virtual-desktop-windows-10
- Mac: https://support.apple.com/guide/mac-help/work-in-multiple-spaces-mh14112/mac
- Linux: will be desktop environment dependent
Assumptions of screen layouts:
- The screenshots below show RStudio since the application itself needs the most screen real estate possible.
- Layout the screens with the least amount of overlap, i.e., showing the most amount of information and tools on the screen at once
- Trying to make windows a quarter of a screen utilize the auto grid-snapping feature in many operating systems.
- Alt-Tab is an option to toggle between screens, but the quick toggle relies on the last active window. So we will try to optimize window toggling via mouse clicks.
An aside on window managers: A window manager is a program that helps easily place your application windows on a screen. Here are some suggested windows managers that are relatively easy to use without going down the rabbit hole of tiling window managers you need to program
- Windows: WindowGrid (Free: http://windowgrid.net/)
- The Windows screenshots below use a 12x6 grid.
- Mac: Magnet (Paid: https://apps.apple.com/us/app/magnet/id441258766?mt=12), Rectangle (Free: https://github.com/rxhanson/Rectangle), or Divvy (https://mizage.com/divvy/), There is a recent and relevant tweet about Mac window managers here.
- Linux: Your options are really only programmed tiling window managers, some desktop environments, e.g., KDE, have plugins you can use that are more beginner-friendly.
For students
The goal for students is to maximise the amount of screen space for things they would need access to:
- Instructor video (e.g., Zoom meeting video)
- Workshop chat (e.g., Zoom group chat)
- Way to signal for help (e.g., Zoom participants list)
- Student workspace (e.g., their own shell, rstudio, jupyter notebook window)
- Notes/extras
- Can be a browser that contains:
- Etherpad
- Current lesson cheatsheet
- Their own notes in a Word document.
- Can be a browser that contains:
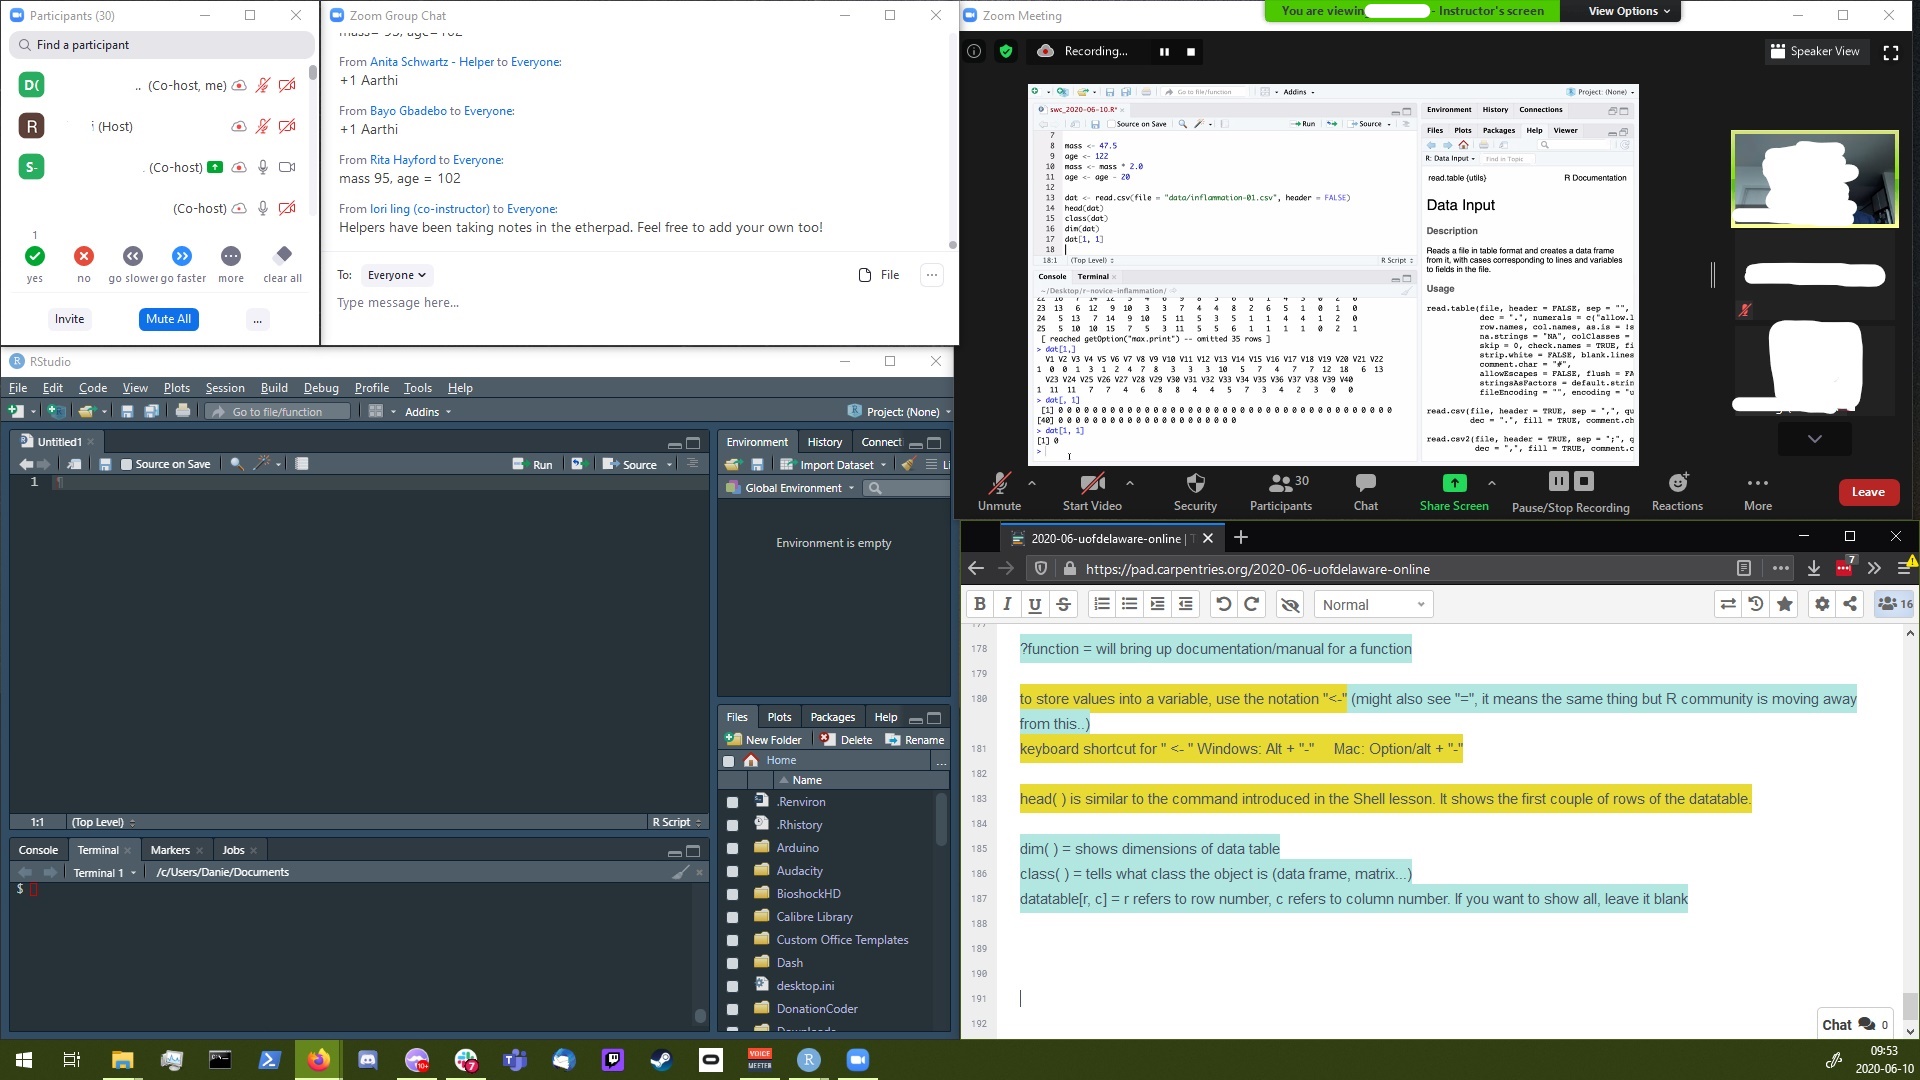
Larger resolutions: 1920x1080+
1920x1080 resolution screens are becoming more common, but they are mainly seen in laptops at least USD 1000 so not all participants will have them. However, they do provide a way to lay everything out with minimal overlaps.
- Instructor screen share (you may get a bigger screen share video if you check off View Options > side-by-side mode)
- Use speaker view and double click the instructor so if someone else talks or the microphone loses focus the screen also does not lose focus
- A quarter of the screen is better than using the entire half of the screen since the video will not stretch vertically and would only show black spaces.
- Student’s own window to follow along
- This can take up more than a quarter of the screen so they have more space to work with, but can be adjusted as needed.
- (Zoom) participant list (so they can use the flags)
- (Zoom) chat
- Used to ask questions and see responses to other questions.
- The etherpad/chat can be made smaller to make room for a larger student workspace and instructor video. For zoom videos. If the screen is too long, you would only get black space, so there would be some optimal size here. The “quarter” is simple as many desktop UIs have a quick snap feature.
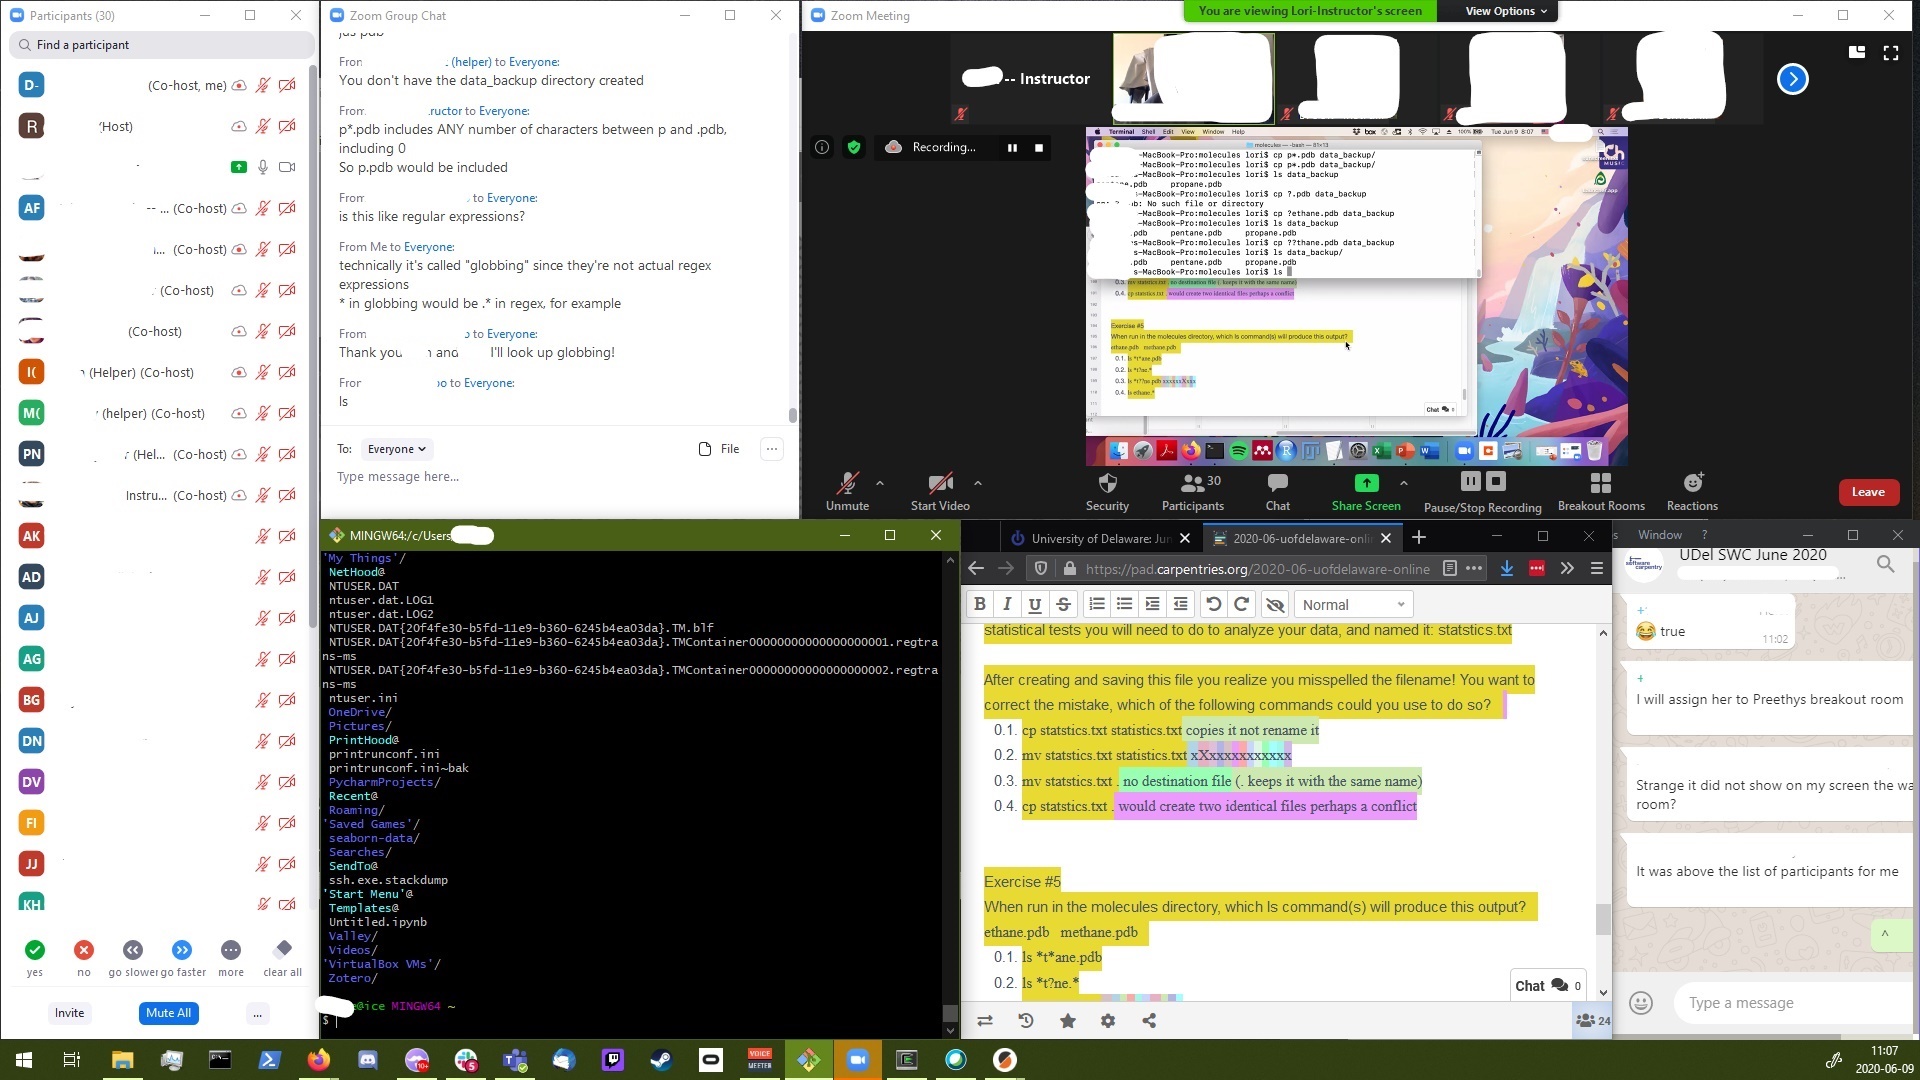
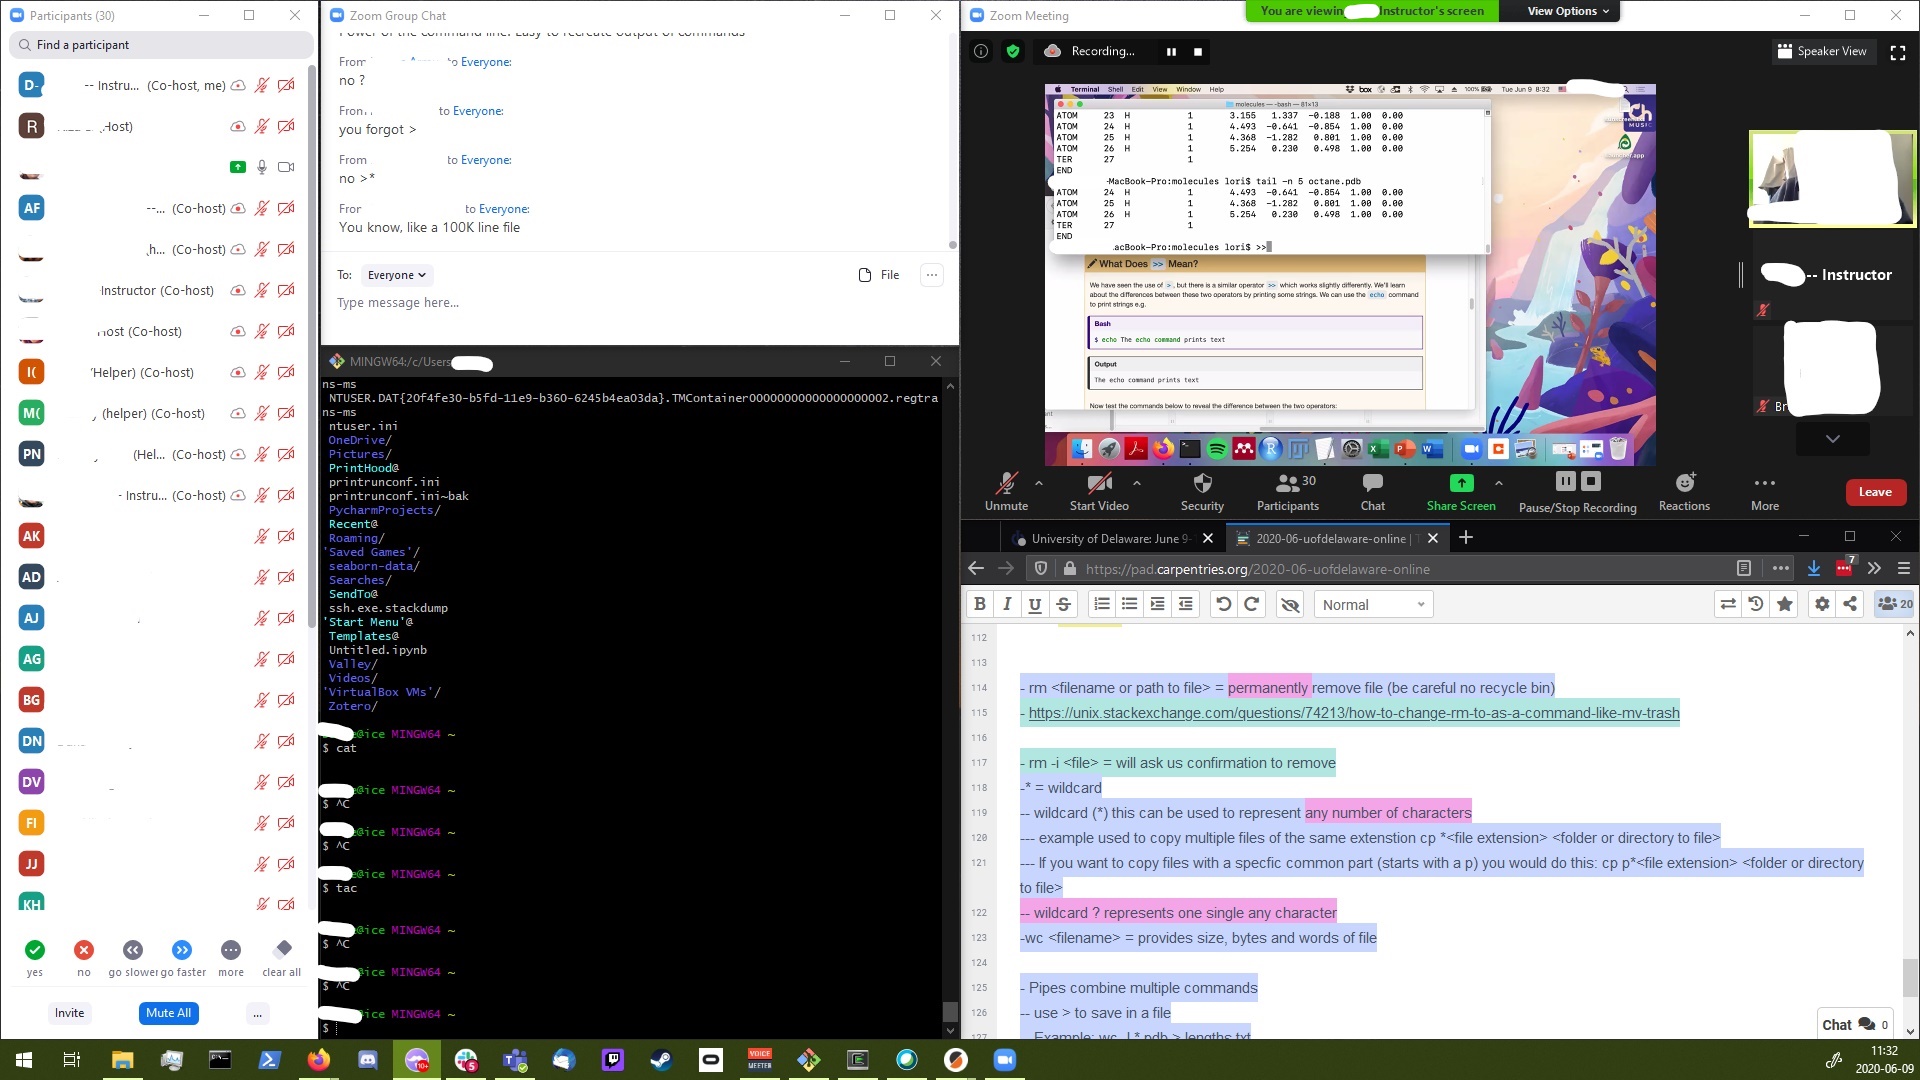
Screenshots on a windows computer using a single 1920x1080 24” monitor. Things are clearly visible with the monitor being a hand palm reach away.
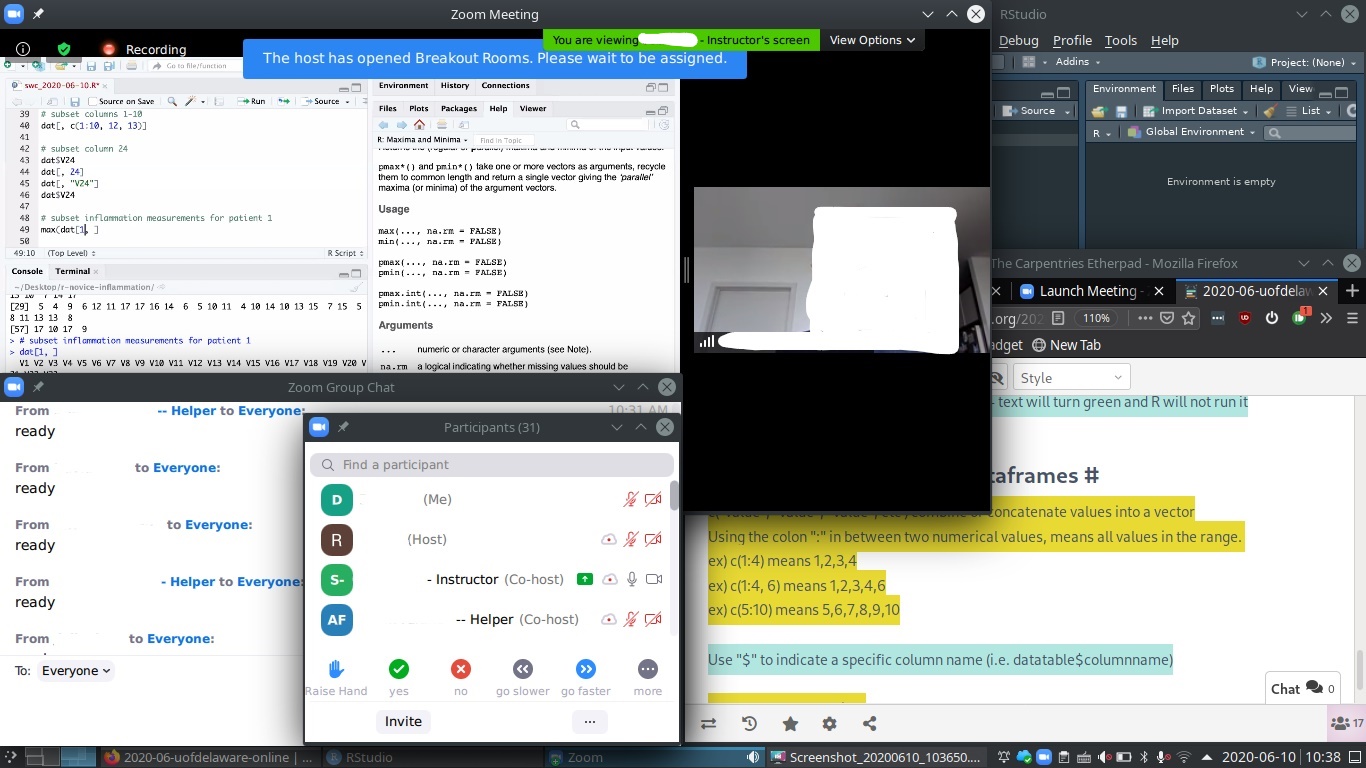
Smaller screens and resolutions (1440x900, 1366x768, and 1280x800)
Not everything will be able to fit on the screen so some compromises would need to be made if the student has a smaller screen, especially using RStudio since the application itself has multiple sections. For students with a smaller screen the etherpad link would need to be hidden or in another desktop (i.e., virtual desktop)
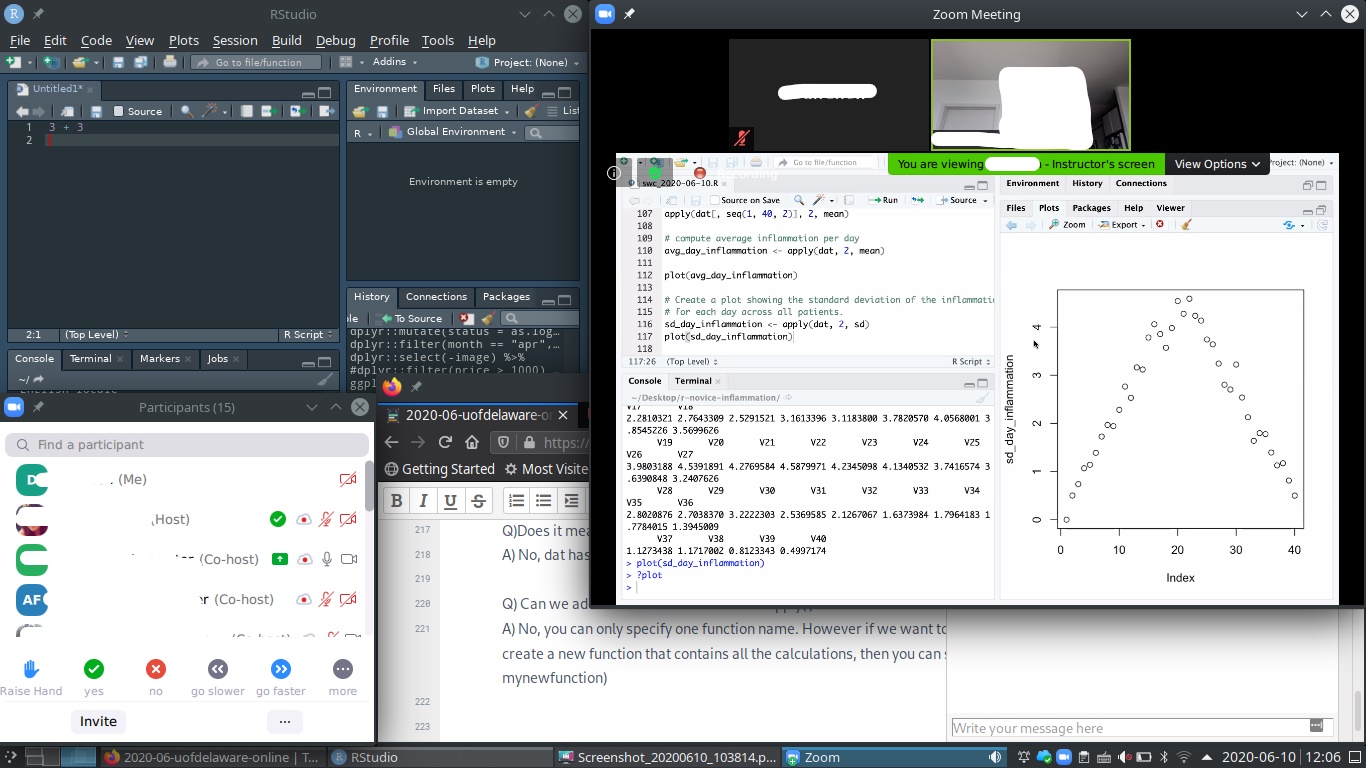
These screenshots are on a 12.5” laptop with a 1366x768 screen running KDE in Linux:

The Zoom window needs to be manually set and then the rstudio/bash window would be used to cover the speaker images.
In Zoom the chat has a minimum size it will let you shrink the window to. So you want to make sure the important part of the video window does not get covered by the chat window. The participant list would be covered by chat, but this should be okay since students would only use it when they need to flag for help.
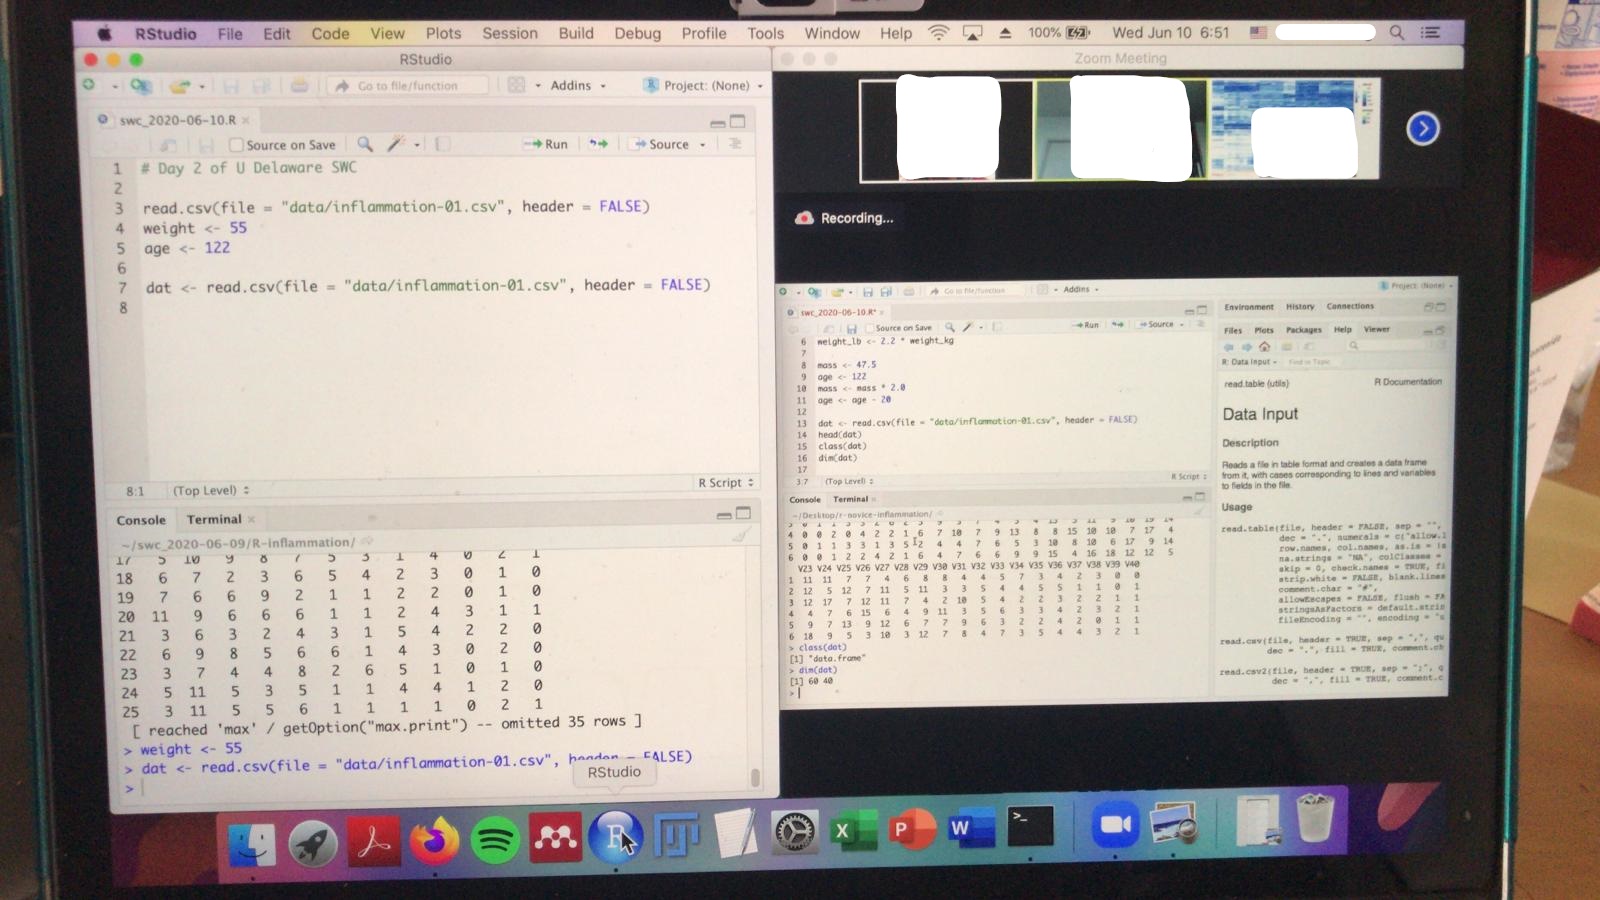
Showing fewer windows
You can also maximise the video and working screen. The main drawback here is that the student will not be able to see any conversations in chat. So questions, solutions, and tips that are discussed in chat may be lost.
Here the right 2 panels of the RStudio window are dragged to the right so they are hidden. This maximizes the script and console panes so the instructor may need to be careful when using the environment, files, and plot panels while teaching.
These screenshots are from a 13” Macbook with a 1280 x 800 resolution.
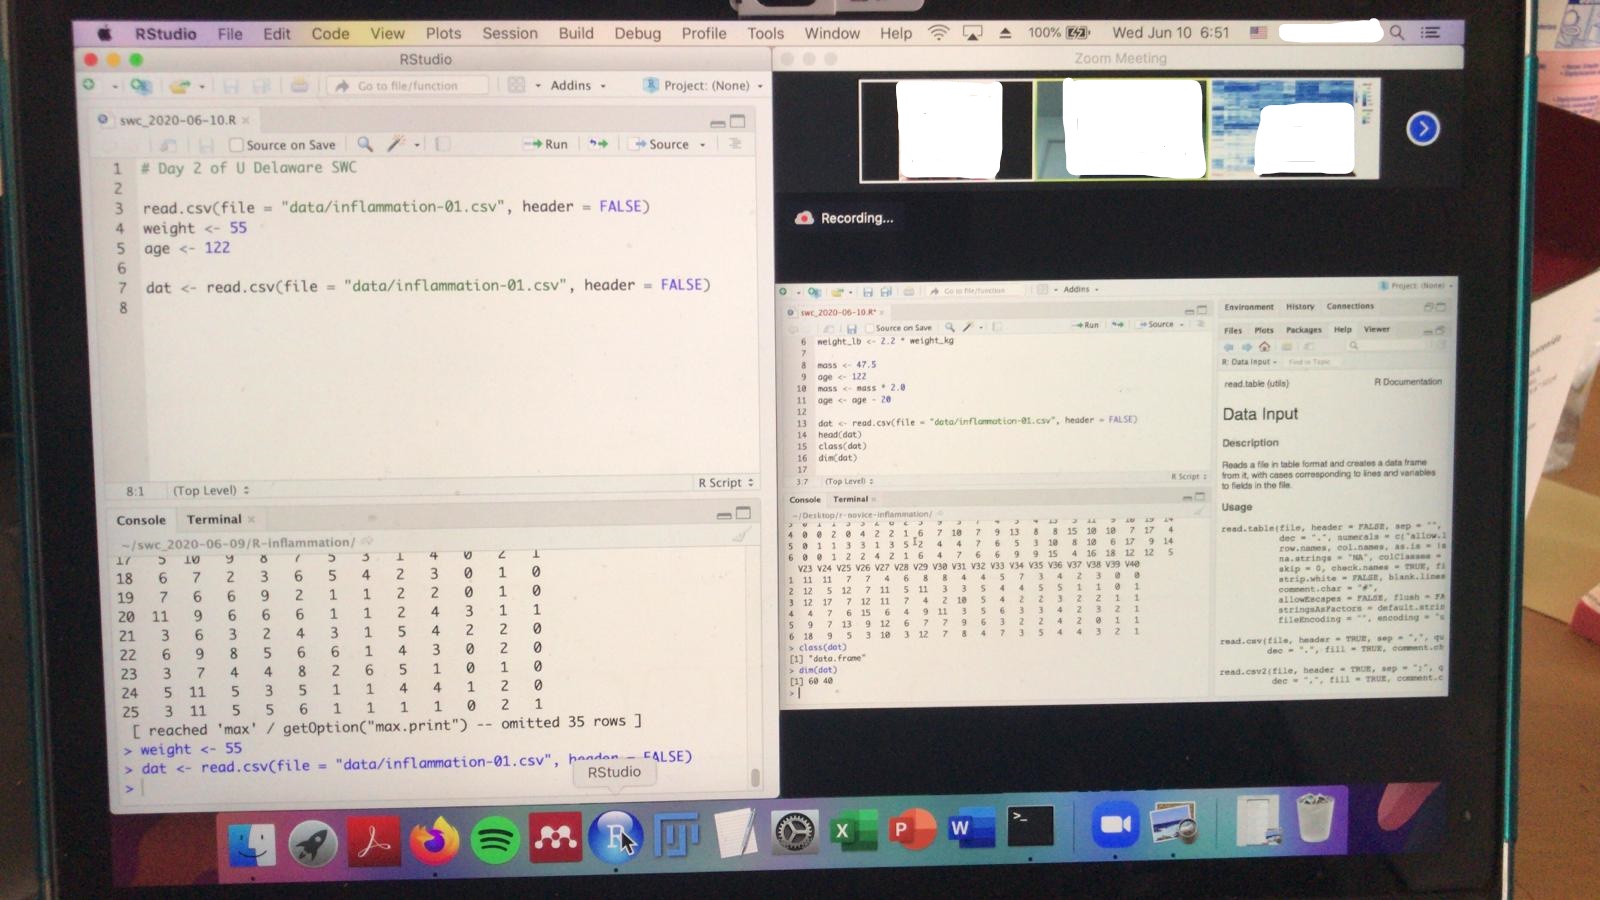
The chat screens would be hidden under the student application window.
For helpers
The goal for helpers is to maximise the amount of screen space for things they would need access to, to help students.
- Instructor video (e.g., Zoom meeting video)
- Workshop chat (e.g., Zoom group chat)
- Way to look who needs help (e.g., Zoom participants list)
- Workspace to test examples (e.g., their own shell, rstudio, jupyter notebook window)
- Notes/extras
- Can be a browser that contains:
- Etherpad
- Current lesson cheatsheet
- Link to instructor internal chat (e.g., WhatsApp or Slack)
- Can be a browser that contains:
The important features for the helper are:
- Instructor video about the same size (or smaller) than what the student would use
- The helpers can prompt if text is too small or if something is not displaying correctly on the screen.
- Maximise participant list to quickly see who needs help
- Access to the workshop chat (so they can respond to questions)
- Access to the instructor-helper-host chat
Screen layout
Instructor video: For the helpers, they should aim to make the shared video the same size (or smaller) the student would use. This can help with any screen viewing issues that can be pointed out.
Workshop chat: Students will ask questions here for helpers to respond to.
Who needs help: Zoom’s participants list can give various flags (e.g., green yes, red no, go slower, etc). The longer this window is, the more student statuses the helper can see without scrolling.
Workspace application window: This window does not need to be as big as the student’s since the helper is not going to be learning like the students. The usability of this window can be compromised for other windows since the main goal here is to run commands to help debug student questions.
Notes/Extras: Some workshops have a dedicated instructor taking notes in an Etherpad. But it is also important to have some form of communication of only the instructors/helpers handy so real-time logistics can be worked out. There is a small overlap between the etherpad and WhatsApp screen. But you can click on either one at the same time (i.e., the windows do not completely cover each other). This makes it easier to toggle between the 2 screens but also always being able to see new messages or content.
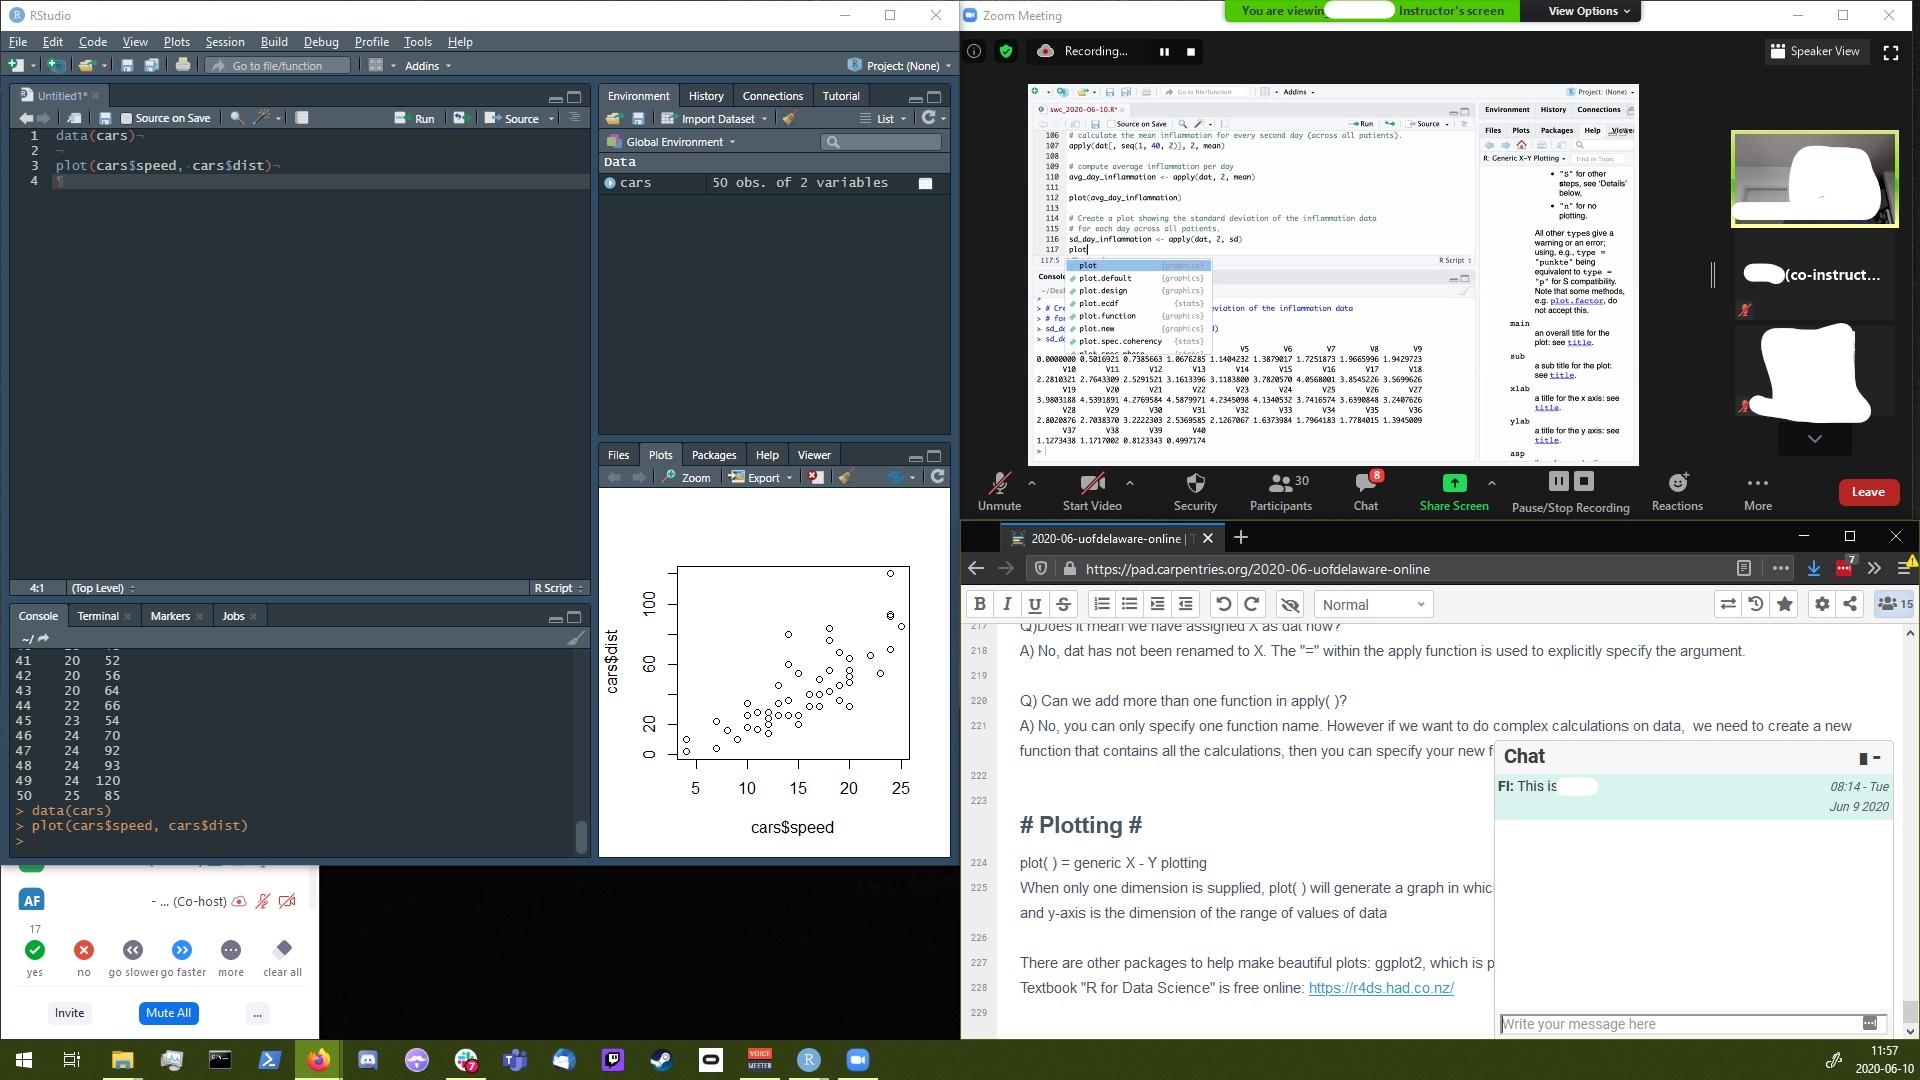
Screenshots are from a 1920x1080 screen:
You might get more real-estate with side-by-side mode.
Your phone
Your phone can also be used during the workshop. Here are some examples of how a phone can be used.
- Students
- Browser page to the cheatsheet/reference page
- Browser page to etherpad for notes
- Call in as a second Zoom user to look at chat (they would still type on their computer)
- Helpers
- Internal instructor-helper-host chat
- Call in as a second Zoom user to look at chat while teaching
Only using Etherpad
Since screen real estate is limited, instead potentially using two workshop chat systems, We can opt to not use the Zoom chat in lieu of the Etherpad chat. This way the workshop notes are also readily visible to the students (and you’ll have persistent chat).
The students would minimise the participants list so only the status buttons are visible. Main downside is there will be some unused space on the screen, but this can be used to move between another window that overlaps with other screens.
It is a little tricker for smaller resolution screens, since there needs to be overlaps. When the student’s RStudio window is active, they will only see the status buttons. But the most recent chat will still be seen and they can quickly click to see the Etherpad notes if needed. The Etherpad window should be stretched past the middle of the screen, otherwise the CSS flow will cause the Etherpad chat to be the entire window and the notes part will not be visible.
Summary
This post is a case-study on many of the logistics running an online Carpentries workshop. In particular, what we could expect a student to see when they are trying to follow along. We cannot assume everyone has the luxury of multiple monitors when attending a workshop. For instructors teaching future online workshops, I hope this post can serve as a guide or reference to your students on the best way to manage their windows during an online workshop.