Being a Carpentries Maintainer and the Skills You Can Learn
Back in 2016, I wrote a blog post about “What the Carpentries Mean To Me” and it traced how everything I know these days stems from my first SWC workshop in 2013. I still hold the same sentiment today.
In the past few years, one of the biggest skills I have become more fluent in is Git version control and collaboration. As a part of Carpentry instructor onboarding, we are asked to submit a Pull Request to an existing lesson. This serves as a litmus test to make sure things are working and you’ve gone through the collaboration process at least once (nobody is expecting a full understanding of Git). But, maintainers do need to be somewhat comfortable with Git.
You can be a Carpentries Maintainer!
You do not need to be a Git-mastics guru to be a Carpentries maintainer. If you finished instructor onboarding, then you have already gone through most of the components of being a maintainer. The rest is practice, and what better way to practice than to do the actual task? There will always be someone to help you if you get lost. The Carpentries is now accepting applications for Maintainer Onboarding, read Angela Li’s post and apply!
The great thing about Git, is that it’s pretty difficult to lose work, so there’s room for making mistakes. Also, GitHub as made it way easier to edit incoming PRs.
Learn branching workflows and practice on your own
Since it is out of scope for the workshops, branching is not covered in the Git lesson. So you are going to have to learn branching elsewhere.
One of the biggest things you can do to practice on your own is to create a repository for every project you do (you can use BitBucket for unlimited private repositories) and send your self PRs and merge your branches using the web PR interface (instead of merging branches via the command line).
Eventually, you will want to end up working with multiple branches at the same time. This can be a separate branch for the documentation, tests, and feature in your code. It can also be the introduction, methods, and discussion section of a paper. This way you will be “maintaining” your own project.
Maintaining is asynchronous
Angela Li is the current Carpentries Maintainer Community Lead. We just got through pilot sessions trying to get maintainers more community support. One of the topics we talked about was the asynchronous nature of maintenance work. Usually a lot of new issues and PRs come in during the end of an instructor onboarding class. But that may not line up with a maintainers schedule.
If the PR has no issues and can be merged as-is, then there usually isn’t a problem. However, when a change has to be made to the PR to be accepted, things can be a bit more complicated. You can always take the original PR and resubmit the corrected PR yourself. This way you get the changes for the lesson, but you end up losing the contributor in the commit history. Let alone putting more work on yourself. This becomes a problem since the lessons are now “published” using the contributors of the repository, so as a maintainer you need to be careful about potential lost attribution.
Editing a PR
Since 2016, GitHub has defaulted an option for PRs to be edited by maintainers.
If you are thinking about being a maintainer, or curently a maintainer wondering how some of the more complex Git tasks are done, here’s a small tutorial of steps.
Overview
A PR comes in from a collaborator as a branch they want to merge into the upstream (i.e., lesson) repository. If a maintainer wants to make a change to the PR, they need to make a change to that particular branch. The general steps of doing so is:
- Get access to the branch in the PR
- Make the necessary changes
- Push the changes up
The part that may be new to people is the first step of getting access to the branch in the PR.
Adding the contributor’s fork as a remote
To get access to the contributor’s branch, we need to add their forked repository as a remote. Here, we can get the URL of the fork by going to their page and clicking the “clone and download” button. You’ve probably done this before, just not for this exact purpose.
I usually name the remote the contributor’s GitHub username.
$ git remote -v
origin  git@github.com:chendaniely/2020-02-26-git_collaboration.git (fetch)
origin  git@github.com:chendaniely/2020-02-26-git_collaboration.git (push)

$ git remote add angela-li git@github.com:angela-li/2020-02-26-git_collaboration.git

$ git remote -v
angela-li       git@github.com:angela-li/2020-02-26-git_collaboration.git (fetch)
angela-li       git@github.com:angela-li/2020-02-26-git_collaboration.git (push)
origin  git@github.com:chendaniely/2020-02-26-git_collaboration.git (fetch)
origin  git@github.com:chendaniely/2020-02-26-git_collaboration.git (push)
Getting the changes from PR
Now that Git knows where to look for new commit information/history,
we can run git fetch --all to get all the commits and branches from all our remotes.
I also use --prune to make sure things are a bit cleaner when I’m looking at the history.
$ git fetch --all --prune
Fetching origin
Fetching angela-li
remote: Enumerating objects: 5, done.
remote: Counting objects: 100% (5/5), done.
remote: Compressing objects: 100% (3/3), done.
remote: Total 3 (delta 2), reused 0 (delta 0), pack-reused 0
Unpacking objects: 100% (3/3), 669 bytes | 669.00 KiB/s, done.
From github.com:angela-li/2020-02-26-git_collaboration
 * [new branch]      master     -> angela-li/master
 * [new branch]      patch-1    -> angela-li/patch-1
You’ll see here that it picked up the new branch from the contributor we added as a remote. Looking at the log we now have access to the new commit from the PR.
$ git log --oneline --graph --decorate --all
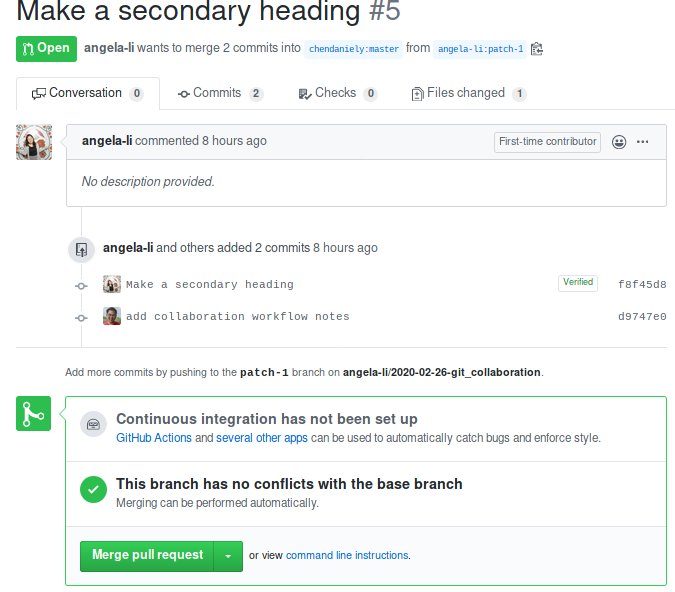
* f8f45d8 (angela-li/patch-1) Make a secondary heading
* 2250ae2 (HEAD -> master, origin/master, origin/HEAD, angela-li/master) Merge pull request #4 from chendaniely/rebase_branch
|\
| * 4f78092 fix conflict
|/
* 30489ee change the title of the readme file
Checkout the HEAD of the PR
To make a change to the PR, we need to first go to the latest commit on that branch (i.e., the HEAD of the branch).
$ git checkout angela-li/patch-1
Note: switching to 'angela-li/patch-1'.

You are in 'detached HEAD' state. You can look around, make experimental
changes and commit them, and you can discard any commits you make in this
state without impacting any branches by switching back to a branch.

If you want to create a new branch to retain commits you create, you may
do so (now or later) by using -c with the switch command. Example:

  git switch -c <new-branch-name>

Or undo this operation with:

  git switch -

Turn off this advice by setting config variable advice.detachedHead to false

HEAD is now at f8f45d8 Make a secondary heading
dchen@longclaw [~/git/teaching/2020-02-26-git_collaboration]  ((f8f45d8...))
However, since we only have a reference to the remote branch, we need to create a branch locally. I highly recommend you name the branch the same name as the contributor’s remote branch.
$ git checkout -b patch-1
Great, now we’re exactly where we need to be. We are at the latest commit from our contributor, and working on a copy of the branch locally on our machine.
$ git log --oneline --graph --decorate --all
* f8f45d8 (HEAD -> patch-1, angela-li/patch-1) Make a secondary heading
*   2250ae2 (origin/master, origin/HEAD, angela-li/master, master) Merge pull request #4 from chendaniely/rebase_branch
|\
| * 4f78092 fix conflict
|/
* 30489ee change the title of the readme file
Correct the PR
Now, we go back to basic Git mode: make a change, add, and commit the changes.
In this example, I added a few new lines to the README.md file:
$ git diff README.md
diff --git a/README.md b/README.md
index ebca766..7f5be13 100644
--- a/README.md
+++ b/README.md
@@ -24,3 +24,8 @@

 - `rebase` and `cherry-pick`: are ways to re-write history or incorate other commits into current history

+- There are different collaboration workflows
+  - https://www.atlassian.com/git/tutorials/comparing-workflows
+  - direct collaborator
+  - branching
+  - forking
Add and commit our changes just like we’re used to, nothing fancy here.
$ git status
On branch patch-1
Changes not staged for commit:
  (use "git add <file>..." to update what will be committed)
  (use "git restore <file>..." to discard changes in working directory)
        modified:   README.md

no changes added to commit (use "git add" and/or "git commit -a")
$ git add .
$ git commit -m "add collaboration workflow notes"
[patch-1 d9747e0] add collaboration workflow notes
 1 file changed, 5 insertions(+)
Push new PR changes
Instead of pushing to origin master or upstrea master like we’re normally used to,
we push to the contributor’s branch, in my case, it’s angela-li patch-1.
$ git push angela-li patch-1
Enumerating objects: 5, done.
Counting objects: 100% (5/5), done.
Delta compression using up to 4 threads
Compressing objects: 100% (3/3), done.
Writing objects: 100% (3/3), 417 bytes | 417.00 KiB/s, done.
Total 3 (delta 2), reused 0 (delta 0)
remote: Resolving deltas: 100% (2/2), completed with 2 local objects.
To github.com:angela-li/2020-02-26-git_collaboration.git
   f8f45d8..d9747e0  patch-1 -> patch-1
Now when we got back to the main repository, the new commit for the PR is there.
Merge!
With the PR corrected, we can merge the changes as we normally would, by clicking the green button.
Just a note: different organizations will handle merging differently. GitHub has added the ability to “Squash and Merge” directly in the PR merging process. As a Carpentry maintainer, I suggest you not use the “squash and merge” feature because the “squash” will mean all the commits in the current PR will be “squashed” into a single commit, and since a commit will be assigned a Name and E-mail, the one assigned to the squashed commit will be you, the maintainer, not the contributor, i.e., you will loose attribution.
Conclusion
There are so many small details about being a maintainer people do not realize until they’ve accepted the role. But treat it as a great learning opportunity! If you’ve done instructor training, the core Git concepts are there, practice will lead to mastery. What better way to practice than working on a massive open-source project with 100s of contributors?
You will not be a maintainer on your own, there’s always someone who will be there to help you out.